Another day, another manual database cleanup. It’s not that it’s hard to do, it’s worse, it’s boring and tedious. Why not take the software developer’s way out and spend some time to find a way to automate the solution? Using Python, Kubernetes, and Cron Jobs you can easily automate away small, regular tasks.

💡If you're interested in creating reproducible, isolated development environments for your Python or Kubernetes projects, you should check out Devbox!
In this post, we’ll cover:
What is a Cron Job
Examples of Cron Job Schedules
When Should We Use Cron Jobs?
How to Configure and Deploy a Python Cron Job in Kubernetes
Creating an Example Python Cron Job
Containerization of a Python Cron Job
Kubernetes Cron Job Config File
Running our Kubernetes Python Cron Job
Summary of Cron Jobs in Python with Kubernetes
What is a Cron Job?
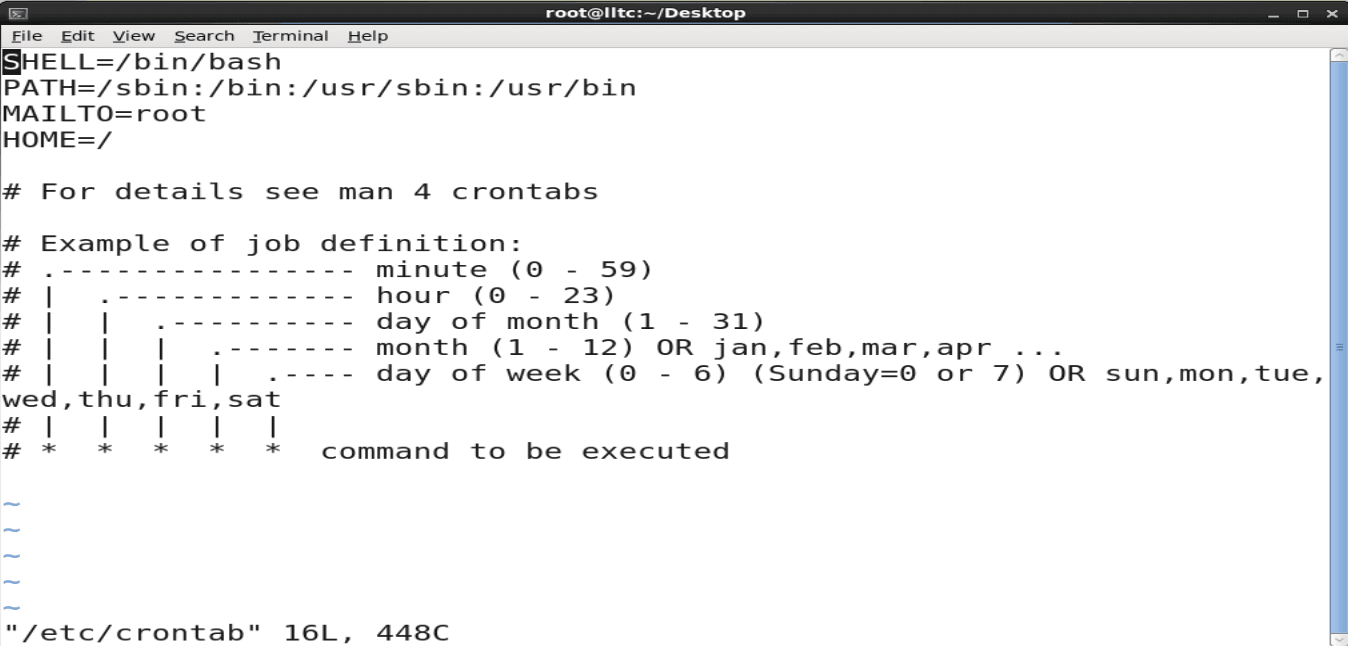
As a technology, cron was released almost 50 years ago in May of 1975. The cron utility is a job scheduler for Unix-like operating systems. Cron Jobs are defined in a crontab or cron table file. Each line of a crontab specifies a Cron Job.
We need six parameters to define a Cron Job. The first five we have to specify are time related. They are the minute, hour, day of the month, month of the year, and day of the week, in that order. The sixth parameter is the command to execute. As shown in the image below.

Examples of Cron Job Schedules
Cron Schedule
English Translation
*/5 * * * *
Cron Job runs every 5 minutes
0 0 1 * *
Cron Job runs at 12:00am on the first of the month
12 4 * * 0
Cron Job runs at 4:12 every Sunday
On a Unix-like system we’re pretty limited in the commands that we can process. However, Kubernetes extends Cron Jobs to run pretty much any containerized script. Kubernetes Cron Jobs are most useful for scheduling recurring tasks in your cluster.
In this post, we’re going to cover how you can use Python and Docker to create a basic Kubernetes Cron Job. The example we’re going to use is a simple “Hello World” type of example that prints the start of the script, waits 3 seconds, and prints the end of the script.
When Should We Use Cron Jobs?
We’ve already established that Cron Jobs are best used for scheduling repetitive tasks, but when should they be used? Cron Jobs should be used for anything that has to get done at a regular interval that you a) don’t want to manually do and b) are already scripting or know you can script.
Examples of good uses of Cron Jobs include:
Refreshing or invalidating a daily cache,
Extracting log data to your data warehouse
backing up or transferring data between sources every hour or week.
Examples of tasks that can not or should not be done with Cron Jobs include
Finding all entries related to a user
Execution of functions that rely on each other's outputs (do this with Kubernetes Jobs or Jetroutines)
Anything that requires variable input.
How to Configure and Deploy a Python Cron Job in Kubernetes
In this post, we’re going through a conceptual overview of how to create, configure, and deploy a Python script as a Cron Job in Kubernetes. We’ll need to have Python, Docker, and the Kubernetes command line tool to follow this example.
We will need to create three files for this example. First, we’ll need to write the Python script we want to run in our Cron Job, then we’ll need a Dockerfile to containerize the script, and lastly we’ll need the Kubernetes config file to define the Cron Job.
Creating an Example Python Cron Job Script
Our Python Cron Job script will simply print out the time that we start the operation, wait for three seconds, and then print out the time at the last step of the operation.
The first step in creating our Python Cron Job script is to start with imports. We need to import the datetime module for the datetime library and the sleep module from the time library. After our imports, we simply set up the first print statement, use the sleep module to sleep for three seconds, and then the final print statement.
from datetime import datetime
from time import sleep

print(f"Starting at {datetime.now()}")
sleep(3)
print(f"Ending 3 seconds later at {datetime.now()}")
Containerization of a Python Cron Job in Kubernetes
Now that we have an example of a Python script for Cron Jobs in Kubernetes, we need to create a Dockerfile to containerize it. We don’t need anything fancy in our Dockerfile to create this image.
We’ll start here with a simple Python image, in our example, Python 3.9. Next, we’ll create a working directory in the image and copy the data in our current folder to that working directory. The only file in our current directory other than the Dockerfile at this moment should be the Python Cron Job file we created earlier (`example_cron.py` ). Finally, on the last line of our Dockerfile, we execute the script.
FROM python:3.9
WORKDIR /app
COPY . /app
CMD ["python", "example_cron.py"]
Now let’s turn our Python script into an image that we can run as a Kubernetes Cron Job. We can use the Docker command line tool to build an image tagged with “example-cron” (or whatever name you want) from the base directory (`.`) using the line below:
docker build -t example-cron .
Kubernetes Cron Job Config File
At this point we are ready to create a Kubernetes config file to create a Kubernetes Cron Job. Our example Kubernetes Cron Job file will create a Cron Job from the image we created earlier that executes every minute.
The first thing we need to do is start with the boilerplate code. The API Version, batch/v1 is the default for the current Kubernetes API for Cron Jobs. We also need to specify that we’re configuring a CronJob, give the name of the cronjob, and define the spec.
In the Cron Job top level spec, we’ll create a job template, name it, and define the containers that will run. We will run the cron-example image we created earlier and define an image pull policy. The image pull policy should be Never if you’re running locally and don’t have access to an image depo. In production this may be IfNotPresent or Always.
Finally, we will define the schedule in our config file. As we mentioned earlier, the schedule for a Cron Job is defined as a crontab with five parameters. Having * in each position means we’re not specifying on that position, so in this example, *\1 * * * * shows that we don’t care what time it is, but we do care that it runs every minute as specified with the \1 attached to the first position.
apiVersion: batch/v1
kind: CronJob
metadata:
  name: cron-example
spec:
  jobTemplate:
	metadata:
      name: cron-example
    spec:
      template:
        spec:
          containers:
          - image: cron-example
            imagePullPolicy: Never
            name: cron-example
            resources: {}
          restartPolicy: OnFailure
schedule: '*/1 * * * *'
Running Our Kubernetes Python Cron Job
Everything is set, let’s apply the config file to run the Cron Job and then see how we can check on it once it is running. We can use the Kubernetes command line tool using the line below in the terminal to apply the config file and create a Cron Job:
kubectl apply -f cronjob.yaml
After that line, we should see this, cronjob.batch/cron-example created, as a printout in the terminal.
Now that our Cron Job is created, we can run the line kubectl get cronjobs to see that the Cron Job is running. Next, we can call kubectl get pods —watch which will show us the Pods that are running. Finally, we can see the logs by calling kubectl logs cron-example-<some ID>. The image below shows an example of an expected output.

Summary of Python Cron Jobs
In this post, we learned about what Cron Jobs are, when we should use them, and how to come up with a simple example using Python to create a Kubernetes Cron Job. The example Cron Job we created was a Python script that showed us when the Cron Job started and when it ended and used Docker to containerize the script
Cron Jobs make it possible to automate repetitive tasks, but as we can see, Cron Jobs themselves can be complex. In order to run our task, we need to containerize it and configure the Cron Job to run in Kubernetes
With Launchpad, we automate this boilerplate in a simplified YAML config. Our launchpad.yml lets you define cron jobs in a literate, easy to read format, so you don’t have to memorize the full crontab format.
For example: If we wanted to deploy the script above using Launchpad, all we’d need to do is create a launchpad.yml file in our project directory using launchpad init and answer a few questions about our project:
? What is the name of this project? cron-test
? What type of service you would like to add to this project? Cron Job
? To which cluster do you want to deploy this project? my_cluster

Written config file at ~/src/cron-test/launchpad.yaml. Be sure to add it to your git repository.
For reference guide, visit: https://www.jetpack.io/launchpad/docs/reference/launchpad.yaml-reference/
Launchpad will automatically generate a default config for our cronjob
Once the file is generated, we can modify the launchpad.yml to run our container and Python script as a Kubernetes Cron Job
configVersion: 0.1.2
name: cron-test
cluster: my_cluster
services:
  cron-test-cron:
    type: cron
    command: "python example_cron.py"
    schedule: '* * * * *'
A simplified cron job definition
When you run launchpad up with this code, the Jetpack SDK and Runtime will automatically generate the Kubernetes config and boilerplate to run your job every minute. No need to write and apply the Kubernetes yaml manually!
If you'd like to learn more about Launchpad, visit the link below to get started.


